![]()
![]()
![]()
![]()
|
|
|
|
|
SQL 2005 Express Manager is provided with your VisionVPM Software. This tool can be used to run one-off or scheduled backups of your database. You should use this tool in conjunction with your operating systems backup program and removable media to create a high availability backup procedure.
By creating three backup jobs and having a local copy and an off-site copy you will have more options when and if you are required to restore the database. Create three scheduled backup jobs for:
Each of these backups should have its own directory on the server's hard drive. For example, on the server's hard drive create a folder called c:\Backups and in this create three folders called Daily, Weekly and Monthly. Use the backup tool to schedule the three backup jobs to be backed up into the appropriate directory.
Note: You do not need to shut down any VisionVPM programs in order to backup.
Always take a backup home or off-site. Use the operating system's backup program to create a backup routine that will backup the contents of the dbBackup folder onto your removable backup media. Removable backup media could be a re-writable CD, Tape, Memory stick, etc. This way you will protect your valuable data from hard drive failure, fire, theft, etc.
Test backed up data to ensure that it will restore and that it is current.
To perform a one off backup of your VisionVPM SQL database you need to.
Enter the location to back up to or use the Browse button to find the location for the backup.
To schedule an automated backup you need to:
When VisionVPM updates are available, VisionVPM will notify you by email. The email will contain a link to the ftp site from where the update is available, instructions on the updating process and a copy of the relevant release notes.
Installing an update is a technical procedure and if you are not comfortable with basci windows functions such as copying and pasting files or locating the server across the netword, you should ask an IT technician to perform this procedure.
Before you install the update, you must do the following:
Ensure the file name is VPMUpdate.exe.
The file VPMUpdate.exe has been saved in the Omnis7 folder on the server and you are ready to install the VisionVPM update.
The server will be updated to the new version of VisionVPM.
The workstation will be updated to the new version of VisionVPM. This procedure needs to be repeated on each workstation.
Note: If the VPMUpdate.exe file is copied to a memory stick, this can be carried between computers for installation of the update rather than having to locate the server from each workstation.
VisionVPM is serviced by the Provet IT Service Desk which has a number of software support and technical support staff to assist with your questions.
User Manuals and online help are available from the VisionVPM website: www.visionvpm.com - click the VisionVPM Support button on the left side of the website to access information and options. The on-line help can be accessed directly from VisionVPM on any computer with internet access by going to Help menu > VisionVPM Help (F1). The VisionVPM website can also be accessed from the Help menu > VisionVPM on the Web > VisionVPM Web Site.
Premium support clients can access VisionVPM support on toll free numbers: 0800 847 876 for New Zealand clients and 1800 150 264 for Australian clients.
The Provet IT Service Desk can also be contacted
Sometimes your questions are most easily answered if we can see what you are doing and what is happening as you are doing it.
Provet IT (with your permission) can access your computer remotely from our office and view what you are seeing on your computer screen.
Note: This can only be done if you log on to the internet AND follow the instructions given by Provet IT. Provet IT cannot access your computer system without your knowledge and cooperation.
For Provet IT to provide remote access support, the computer you are using must have access to a broadband internet connection.
Before trying to access the VisionVPM remote support website, first contact Provet IT by phone to confirm that remote access is needed and that there is an operator available.
Once it is agreed that Provet IT will access your computer remotely, you can access the remote support from either

Both options will take you to the HelpBeam website:
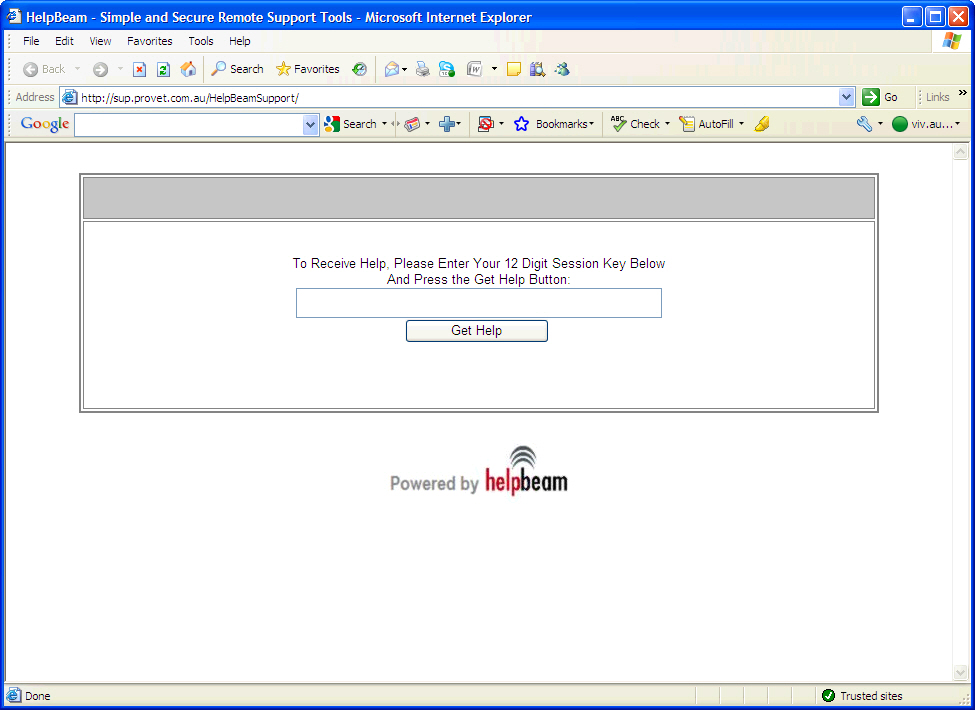
Provet IT will then supply you with a 12 digit number that you will enter. Please note that these numbers change on a regular basis.
Enter the number you are given and click Get Help.
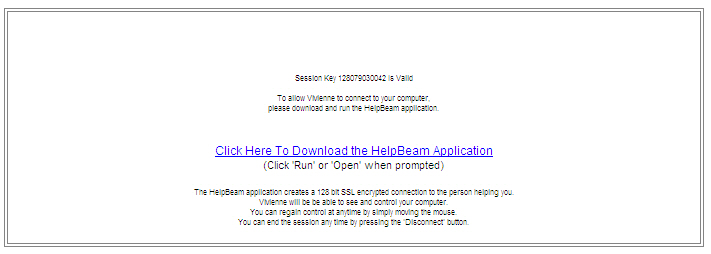
Click on Click Here to Download the HelpBeam Application.
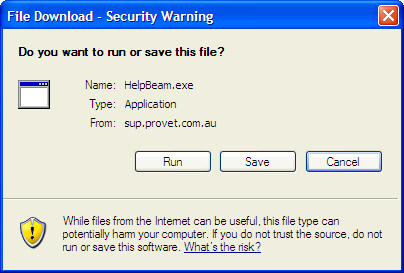
Click Run to run the application.
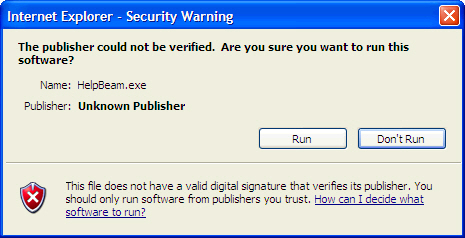
Click Run to continue.
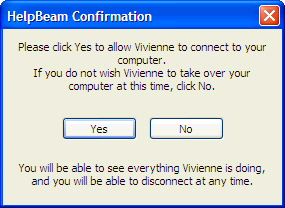
Click Yes to allow the operator to have remote access to your computer.
A disconnect prompt will be displayed in the centre of your screen. Minimise this prompt. If any any time you wish to or need to disconnect, maximise the prompt again and click disconnect.
The connection can also be terminated by VisionVPM. This will happen at the end of the support call or when the issue is resolved.
Very occasionally, because of firewalls, virus protection or the way clinic computers are setup, VisionVPM will be unable to access your computers in the above way. There are alternative access solutions available for most, but not all scenarios.
Sometimes if a computer cannot be accessed remotely or a problem is particularly involved or may require considerable investigation or testing, VisionVPM may ask for a copy of your database. These copies may be sent via CD (though some are now getting too large for a CD) or can be uploaded to VisionVPM's ftp server. Your data will only be accessed by VisionVPM staff and only for providing solutions to the questions you have asked.
Run a one-off back up and copy it to a CD or upload it to the ftp server.
(ftp means file transfer protocol)
Please use either WinZip or WinRAR to compress the datafile. These programs can be downloaded for evaluation or use if you have not already installed them from:
You will now have a *.zip or *.rar file. Right click and take a copy of this file.
Go to: VisionVPM > Help menu > VisionVPM on the Web > Open ftp Uploads Folder
You are now accessing a folder on our ftp site across the Internet.
Right click and paste (or Edit menu and paste function) the compressed file into a new folder created for your clinic.
This will start copying the file. The time taken will depend on the file size and your internet connection speed.
When this is complete, please send an email confirming the upload has been completed to support@visionvpm.com with the subject title "Upload Complete"