A zero stock take could be done, for example, when you have not been using correct stock control procedures and therefore your stock on hand figures are incorrect.
A zero stock take should proceed as for a full stock take, but with two differences:
1. Check settings in System Defaults.
Before you commence the stock take, check these settings are correct for a zero stock take:
Go to: Main menu > Maintenance module > Maintenance menu > System Defaults > Stock tab.
Select the Use a zero stocktake check box.
Click Save.
Once the stock is counted and before the new count is entered, the stock quantities must be zeroed:
2. Zero the stock quantities
Do the following only once before you enter the stock take quantities:
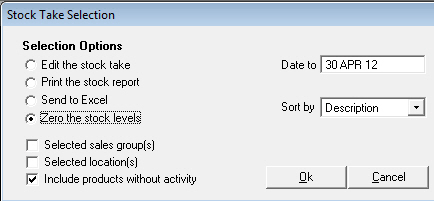
Go to: Stock menu > Stock Taking > Stock Taking Options.
Select Zero the stock levels.
In the Date To field, type the Stock Take Date, that is, the day you counted the stock. The Include Products without activity check box will be selected by default.
For clinics that are departmentalised, click the Dept Code arrow, and then double-click to select the department whose stock quantities you wish to zero.
To zero all departments' stock quantities, clear the Dept Code field
Click OK.
This will zero all stock items' Stock on hand amounts.
If you enter a quantity for a stock item then save the stock take and go back into stock taking and find more of that item, you only need to enter the new amount.
For example, if you enter 5 in one session then save the stock take and go back in and then find another 3 of the same product type in 3.