There is functionality in VisionVPM which allows you to to display your invoices in Sales Group and description order. By using the invoice order you can establish a logical flow to your invoice layout, for example:
Consult
Dental
Diagnostics
Lab
Radiology
Anaesthesia
Surgery
Hospitalisation
Medication
Consumables
Merchandise
Euthanasia.
Please note: The formatting options will affect all invoices, including batch invoicing and hospitalised invoices and invoice statement formats.
If you currently use one hospitalised invoice per stay, and select to use the new formatting option, the hospitalised invoice will be displayed/printed in sales group and not chronological order.
The following procedures document the steps required to set up VisionVPM to use the new functionality.
Step 1: Enable invoice formatting
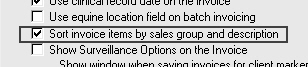
Go to: Main menu > Maintenance module > Maintenance menu > System Defaults > Financial tab.
Select the Sort invoice items by sales group and description check box.
Click Save.
Step 2: Add new sales groups and set the Invoice Sort Order
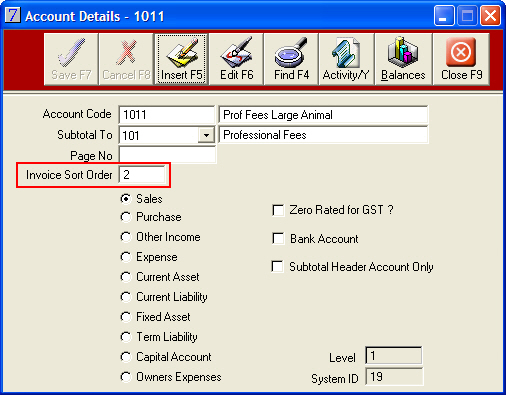
Go to: Main menu > General Ledger module > General Ledger menu > Chart of Accounts > select account.
Type a number in the Invoice Sort Order field.
Click Save.
Items in sales groups with the lowest numbers will appear first on the invoice when it is printed.
The same number can be used more than once. For example, you may wish to allocate the number 2 to Professional Fees Large Animal and Professional Fees Small Animal.
Any sales groups accounts which do not have an Invoice Sort Order will appear at the top of the invoice, therefore, it is important to allocate a number to all sales groups.
Step 3: Add a Sales Group to Multiple Stock Items
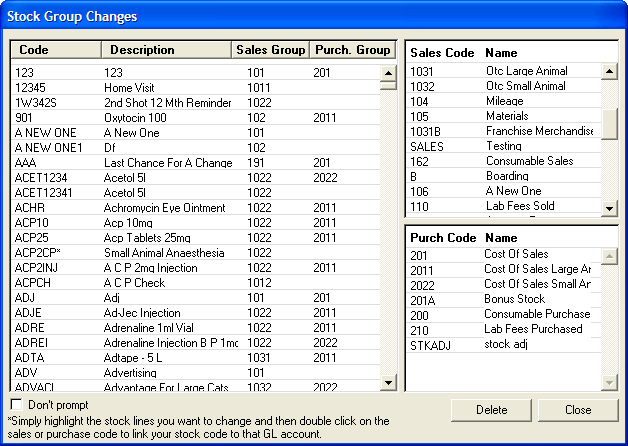
You might only have 3 basic Sales Groups - Professional Fees, Medications and OTCSales - You can create new ones similar to the list above and have them subtotaled to these existing groups. As each new sales group is created, you will need to apply it to your existing products. This can be achieved with the Stock Group Changes tool in the Maintenance module.
Go to: Main menu > Maintenance module > Maintenance menu > Database Maintenance > Set up Datafiles.
You will need to contact the Provet IT Service Desk for the Daily Password.
Go to: New Datafile Routines > Enter Stock Purchase/Sales Groups.
Click Yes to the following prompt:
A list of ALL stock items will be displayed. This list can be sorted by any of the column headers.
Select the products you want to attach to a new sales group category.
Double-click the appropriate Sales Code, for example, Consumable Sales.