VisionVPM allows you to create a syndicate group of owners who have shares in a particular animal – usually a horse.
How does it work?
All syndicate members must first be entered as clients in VisionVPM.
Once all syndicate members have been entered they can be allocated a share of responsibility from the syndicate record.
Horses can then be entered against the syndicate as you would add patients to a normal client.
Any bills (or earnings) related to that animal are then divided according to the ownership shares.
There are 4 steps to setting up a syndicate, as follows:
Create a syndicate record
Attach members to a syndicate record.
Set up a syndicate holding account.
Configure the syndicate holding account.
Step 1: Create a syndicate record
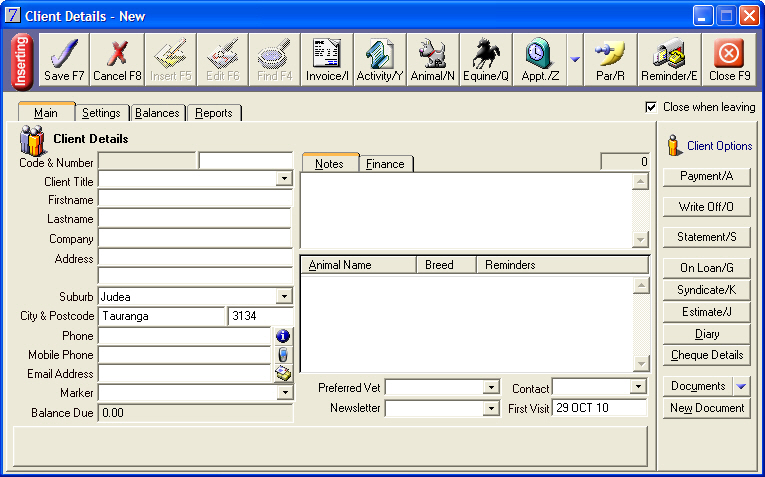
Go to: Clients menu > Client Details.
From the Client List window, click Insert.
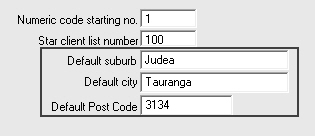
For New Zealand clients, if you have selected to add a Default Suburb, Default City and Default Post Code in Maintenance > System Defaults > Clients tab, these fields will be automatically populated.
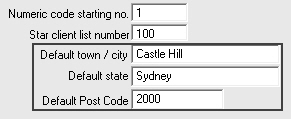
For Australian clients, if you selected to add a Default town / city, Default state, and Default Post Code in Maintenance > System Defaults > Clients tab, these fields will be automatically populated.
The First Visit date will also be automatically populated with today's date, which can be overtyped if required.
Enter the client's name and contact details.
Click Save.
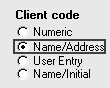
VisionVPM will automatically generate a client Code based on what is selected in Maintenance > System Defaults > Clients tab.
Optional
To enter additional phone numbers, click the button.
In the Mobile Phone field, type the client's mobile phone number, if applicable.
To attach a marker to the client, click the Marker arrow, and double-click to select the marker you wish to insert.
Markers allow the grouping of clients for quick access, mailings, discounts, etc.
Multiple markers may be selected by holding the CTRL key while clicking on the required markers. The Add Selected button can be used to add these selected markers.
In the Notes field, enter any relevant notes about the client.
Select the client's preferred communication method, by selecting an option from the Contact list.
In the Email field, type the client's email address, if applicable. VisionVPM will validate whether it is a correct address.
The following prompt will be displayed, Do you want to mark this client to use email in any future mailouts?. Click Yes to include the client in the email list for marketing searches.
Results
A new client has been entered in VisionVPM.
Animals can now be attached to this client.
A Client Information report can be printed by clicking Print Report on the Reports tab of the Client Details window.
It is important for the clinic to be consistent with the entry of clients' details as this can impact on how well clients can be searched upon and how well client details are generated in a mail merge.
Step 2: Attach members to a syndicate record
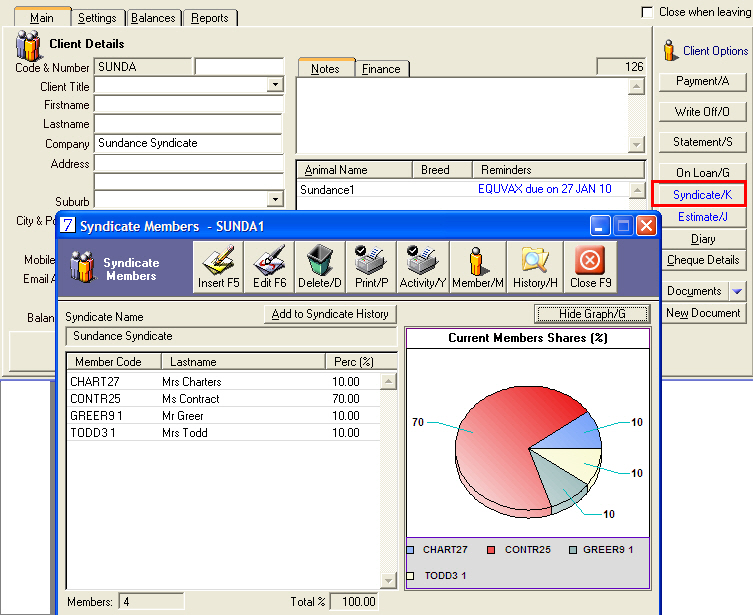
From the Client Details window, click Syndicate.
For each syndicate member, click Insert.
From the Syndicate Share window, click the Client Code arrow, and then locate and select the required syndicate member.
In the Share % field, type the percentage of the share owned by the syndicate member, and then click Save.
Continue steps 2 to 4 above until all syndicate members have been entered and the percentage shares equal 100 percent.
To graph the percentage of the syndicate owned by each member, click Show Graph.
To add the clients to the history of the syndicate, click Add to Syndicate History and click Yes to the confirmation prompt.
To view the Client Details of a syndicate member, select the client and then click Member.
Click Close.
Step 3: Set up a syndicate holding account
Go to: General ledger module > General Ledger menu > Chart of Accounts.
From the GL Account List window, click Insert.
In the Account Code fields, type a code and description for the syndicate holding account.
Select the Current Asset account type, and the Zero Rated for GST check box.
Click Save.
Step 4: Configure the syndicate holding account
Go to: Maintenance module > Maintenance menu > Account Defaults.
From the Account Defaults window, in the Syndicate Holding A/c box, type the code for the syndicate holding account.
Click Save.
Results
The wording on the Syndicate button on the Client Details window will be displayed in blue.
Animal and equine records can now be attached to the syndicate, invoices generated and payments received.