Supplier Details
As with Clients, all Suppliers must first be entered into VisionVPM before they can be used.
- Go to: Main menu > Suppliers module > Suppliers menu > Supplier Details.
- From the Supplier List window, click Insert.

- In the Code field, type a code for the supplier, then in the Name and Address fields, type the supplier's name and address.
- Recommended: In the Phone and Fax fields, type the supplier's phone number and fax number.
- Optional: In the Email Address and Web Address fields, type the supplier's email address and website.
- If GST will not be calculated on transactions for this supplier, for example, an overseas supplier, select the Zero Rated for GST check box.
- For NZ clients to select the supplier's payment method, select Cheque, Direct Credit, or Credit Card.
- Note: If you select Direct Credit, type the supplier's bank account number in the Bank Account field.
- Optional: In the Particulars, Code, and Reference boxes, type the details that will appear on the supplier's bank statement.
- For Australian clients, to select the supplier's payment type, select Cheque, Direct Credit, or Credit Card.
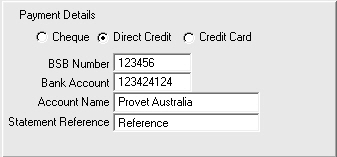
- In the BSB Number and Bank Account fields, type the Supplier's BSB number and bank account number.
- In the Account Name field, type the Supplier's account name.
- If this field is left blank, VisionVPM will default the Account Name to the Supplier's Name and use this name in the autobanking file.
- In the Statement Reference field, type a Reference that you want to appear on the Supplier's statement.
- In the Notes field, type any notes about the supplier.
- Click Save.
The supplier will now appear in the selection list for Suppliers throughout VisionVPM.
You can now enter invoices and payments relating to this supplier.