![]()
![]()
![]()
![]()
|
|
|
|
|
New Documents are Word templates for documents which automatically include the client and animal details. These can be created within VisionVPM.
The documents are merged to Word from either the Client Details or Animal Details windows and are then saved in the client or animal's document folder. Ideally these documents should be stored on the server so that only a single template requires updating with any clinic changes.
On your server, right-click the Window Start button and select Explore.
If there is no Docs folder, click the File menu, point to New and select Folder. Name the folder Docs.
Example below:
![]()
You need to check every computer that is going to merge to MS Word from VisionVPM to ensure the correct path to MS Word is set.
The Computer Defaults window will be similar to the following:

As the Office folder name depends on the version of MS Office installed, at the time of writing, the Office folder will have one of the following names:
Where MS Word is not available, Wordpad can be used. MS Word gives more formatting and document options, so where available, MS Word should be the application of choice. Insert the path to either MS Word or Wordpad, but not both. If using Wordpad select the check box:
![]()
If you want to create a letter which includes the animal's details you must go to an Animal Details window to click the New Document button.
When only the client's details are to be used you can use the New Document button on the Client Details window.
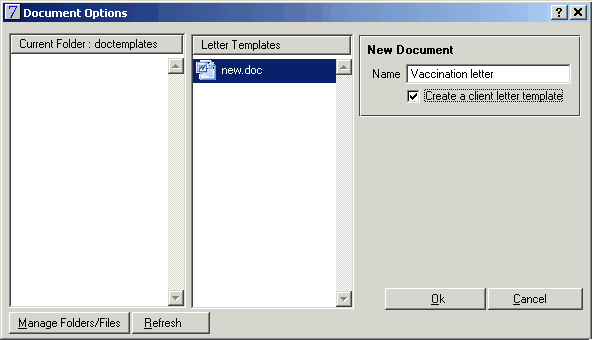
For example, if you wanted to create a vaccination letter you would go to the Animal Details window, click New Document, select new.doc, type Vaccination letter, select the check box and click OK.

These are the available Merge Fields when merging to MS Word using New Document.
Merge Field |
Description |
Merge Field |
Description |
DateTime |
Current Date/Time when merge gets populated |
ClientSeq |
Client Sequence Number |
ClientCode |
Client Code |
ClientNumber |
Client Number |
ClientTitle |
Client Title |
ClientFirstname |
Client Firstname |
ClientLastname |
Client Lastname |
ClientCompany |
Client Company Name |
ClientAddress1 |
Client Address Line 1 |
ClientAddress2ndStreet |
Client Address Line 2 |
ClientAddress2 |
Client Suburb |
ClientAddress3 |
Client City |
ClientPostCode |
Client Postcode |
ClientPhone |
Client Phone |
ClientEmail |
Client Email Address |
ClientCust1 |
Client Custom Field 1 |
ClientCust2 |
Client Custom Field 2 |
ClientCust3 |
Client Custom Field 3 (on the settings tab) |
ClientCust4 |
Client Custom Field4 (on the settings tab) |
AnimalName |
Name |
AnimalNumber |
Microchip No. |
AnimalDesc |
Colour |
AnimalBirthdate |
Animal Birth date |
AnimalBreed |
Breed |
AnimalSpecies |
Animal Species |
AnimalCurrentWeight |
Current Weight |
AnimalOptimalWeight |
Optimal Weight |
AnimalPhoto |
Will display the animal photo if one is loaded |
AnimalCustom1 |
Animal Custom Field 1 |
AnimalCustom1 |
Animal Custom Field 2 |
AnimalCustom3 |
Animal Custom Field 3 |
AnimalCustom4 |
Animal Custom Field 4 |
AnimalSex |
Sex |
AnimalNeuter |
Neuter |
EquineLocation |
Location |
AnimalAge |
Age |
AnimalBodyScore |
Animal Body Score |
AnimalDentalScore |
Animal Dental Score |
AllVaxDue |
All Reminders Due |
AllVaxOverDue |
All Reminders Over Due |
AllVaxCombined |
All Reminders Over Due & Due |
RemCode |
Reminder Code |
RemDesc |
Reminder Animal Colour |
RemQty |
Qty of stock invoiced for reminder. |
RemLastDate |
Last date of reminder |
RemNextDate |
Next date due for reminder |
RemAnimalName |
Reminder Animal Name |
RemStatus |
Status - used for adding a client marker |
ReflVetName |
Referral Vet's Full Name |
RefFirstName |
Referral Vet's First Name |
RefHospital |
Referral Vet Hospital Name |
RefStreet |
Referral Vet Street Address |
RefSuburb |
Referral Vet Suburb |
RefCity |
Referral Vet City & Postcode |
RefPhone |
Referral Vet Phone |
RefFax |
Referral Vet Fax |
Animal photos can be merged into MS Word documents through VisionVPM from the Reminder Schedule or Marketing Schedule.
The animal photo will now be displayed in the document.
You will need to resize the photos to the correct size to be displayed in the document.
Note: Microsoft Word will display the following message if there is no photo attached to the animal, "Error! Filename not specified." This message is not required in the document and should be deleted.
In This Section |
See Also |